The Desmos Computation Layer (CL) gives you a multitude of ways to offer students real-time feedback when they are completing problems in an activity. In this post, I’ll discuss how to provide immediate feedback to students based on their input in a “Math Input” item, a “Multiple Choice” item, a “Checkboxes” item, and “Ordered List” item, a “Table” item, and a “Card Sort” item.
click this link to see a Desmos activity that demonstrates the code used in this post
Feedback using a “Math Input” item
Providing feedback using a “Math Input” item is the easiest way to provide feedback to students in an activity. The way that I favor setting this up is to use two “Note” items and one “Math Input” item. Like this:
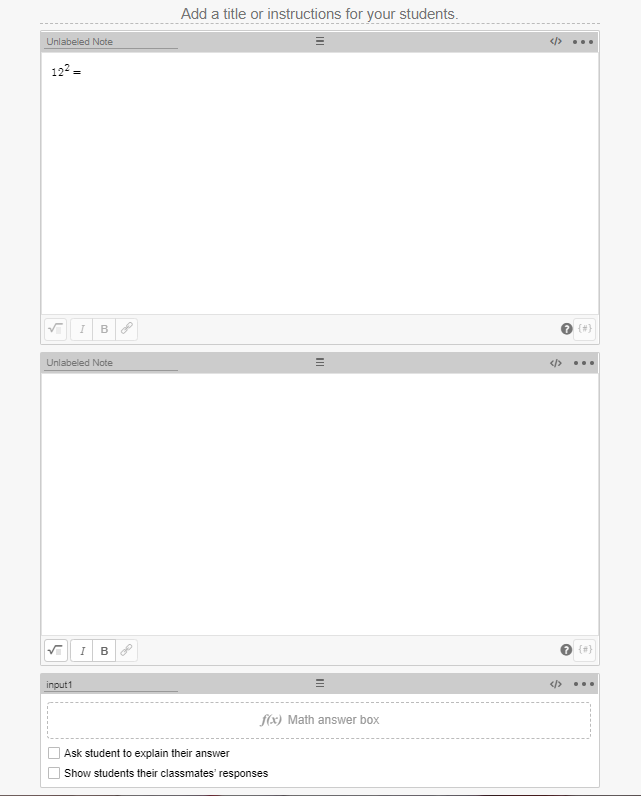
My preference is to put the question / problem in the first “Note” item, and the feedback in the CL of the second “Note” item. The feedback is presented as a “content:” sink. Notice that the “when” conditional statement always has an “otherwise” condition, stating what happens as default if other conditions aren’t met.
In the example problem above, I would write the feedback in the “Note” item 2 CL like this:
content:
when
input1.numericValue=144
 "? CORRECT!"
otherwise ""
This code says that whenever the value in the “Math Input” item equals 144, The content of this cell will be “? CORRECT!”, and if the value is not equal to 144, there will be no content.
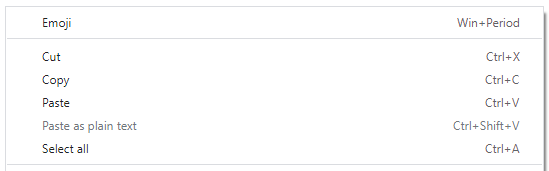
About emojis: I favor putting emojis in the feedback, but you can write whatever feedback you prefer. In order to add an emoji you can add them to the text of any question or content that you like. In Windows, you can add an emoji by right-clicking your mouse or by using the shortcut Win+Period.
You could also write feedback for both a correct and an incorrect answer. Using the same example from above, a code could be:
content:
when input2.numericValue=144 and input2.submitted "? CORRECT!"
when not(input2.numericValue=144) and input2.submitted "? Not quite. Remember that an exponent describes how many times to multiply a base."
otherwise ""
In this example, I wrote feedback to the student if the answer isn’t correct. I also added the condition “.submitted” to each condition. The purpose of “.submitted” is so that the coaching feedback doesn’t appear before the student is able to enter their answer completely.
Feedback using a “Multiple Choice” item
The feedback for a “Multiple Choice” item in the CL is very similar to a “Math Input” item. I like to ask the question in “Note” item 1, write the CL feedback in “Note” item 2, and the student input is a “Multiple Choice” item. Like this:
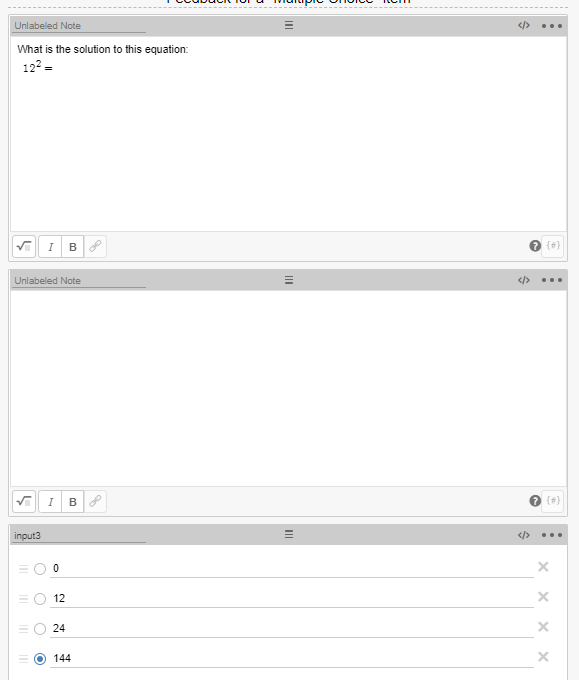
The correct answer for the “Multiple Choice” item would be the fourth answer, so an example of feedback in the “Note” item CL would be:
content:
when input3.isSelected(4) "? CORRECT!"
otherwise ""
This code describes that when the fourth choice is chosen, a student would receive feedback that the item is correct.
Feedback using a “Checkboxes” item
“Checkboxes” items require a little more work than other CL input types. The reason for this is that you have to identify both conditions of each answer in order to give proper feedback. We do this by identifying incorrect answers with the not( ) condition. Here’s the setup:

You can see from this problem that answers 2 and 4 are correct, and that answers 1 and 3 are incorrect. A code to provide feedback for this would have to address the condition for every checkbox, for example:
content:
when
not(input4.isSelected(1)) and
input4.isSelected(2) and
not(input4.isSelected(3)) and
input4.isSelected(4) "? CORRECT!"
otherwise ""
An alternative to just providing one correct answer for a “Checkboxes” would be to provide feedback for all answers (or as many as you would find appropriate). The upside to this would be that students get immediate feedback for each answer, but the downside would be this would make answering the question rather simple.
There are probably other strategies for doing this, but my basic setup for providing feedback for each entry would be to create variables for each answer, in this case a, b, c, and d. The “content:” sink would then just present feedback for every box that the students check. An example of code for this would be:
a= when input5.isSelected(1) "? Oh no! #1 is not correct." otherwise ""
b= when input5.isSelected(2) "Number 2 is ?" otherwise ""
c= when input5.isSelected(3) "? Oh no! #3 is not correct." otherwise ""
d= when input5.isSelected(4) "Number 4 is ?" otherwise ""
content:
"${a}
${b}
${c}
${d}"
A note: putting a variable or an input into ${ } in the CL will present the text of that input or variable as written.
Feedback using an “Ordered List” item
Ordered lists are pretty easy to give binary feedback for, as long as you choose the option in the “Ordered List” item to “Use Order as Answer Key.”
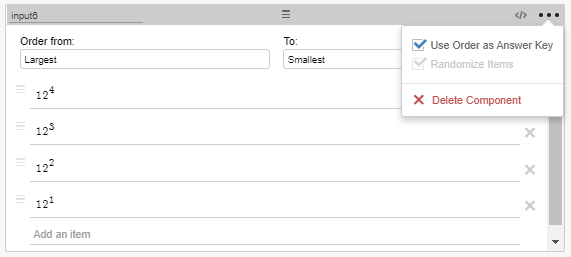
When an ordered list is set up like this, we can use “.matchesKey” in the CL to give feedback for the correct order. Here is an example:
content:
when
input6.matchesKey "? CORRECT!" otherwise ""
If for some reason you don’t choose “Use Order as Answer Key,” you can still provide feedback (and identify the correct answer) using “.orderAtIndex” Here is an example of the “orderedList”:
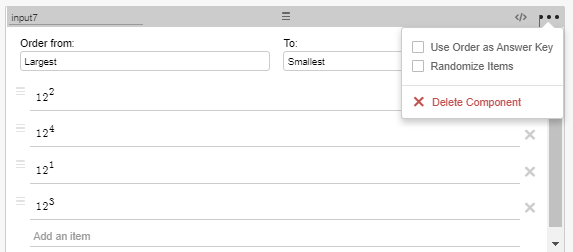
The correct answer for this example would be 2, 4, 1, 3. This would be an example of using “.orderAtIndex” to give feedback when correct:
content:
when
input7.itemAtIndex(1)=2 and
input7.itemAtIndex(2)=4 and
input7.itemAtIndex(3)=1 and
input7.itemAtIndex(4)=3
"? CORRECT!" otherwise ""
Feedback using a “Table” item
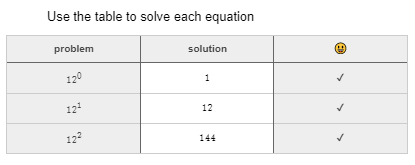
There are a few ways that you can program feedback for a table. The way that I prefer is to create an additional table and to program feedback into each line. Here’s a basic setup with a “Note” item to describe the problem and a “Table” item. Notice the third column with the emoji is the feedback column:

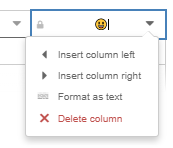
Emoji / table note: If you want to program emojis into a table, you need to format that column as text. If the column is set up to read latex, your emojis will not show up. You can change this in the column drop-down:
In this example, I’m going to use the “cellContent:” sink to populate the third column in the CL for the table. This is different from the other methods in that the code is written in the input item and not in a different note. Here’s an example of code that you can use to do this:
cellContent(1,3):
when input8.cellNumericValue(1,2)=1 "✔" otherwise ""
cellContent(2,3):
when input8.cellNumericValue(2,2)=12 "✔" otherwise ""
cellContent(3,3):
when input8.cellNumericValue(3,2)=144 "✔" otherwise ""
This code identifies the target cell (row,column) and then sets the condition for the emoji check feedback to appear. When a student completes the table it will look like this:
Alternatively, you could create another “Note” item and program feedback for each line as conditional variables. An example of this code would look like this:
a= when input8.cellNumericValue(1,2)=1 "? Equation 1 is CORRECT!" otherwise ""
b= when input8.cellNumericValue(2,2)=12 "? Equation 2 is CORRECT!" otherwise ""
c= when input8.cellNumericValue(3,2)=144 "? Equation 3 is CORRECT!" otherwise ""
content:
"${a}
${b}
${c}"
Feedback using a “Card Sort” item
The last type of item we’ll talk about is the “Card Sort” item. This is a little different than the others because you cannot add a note a card sort. In this case, we’ll program feedback into the “subtitle:” Here’s the basic setup:
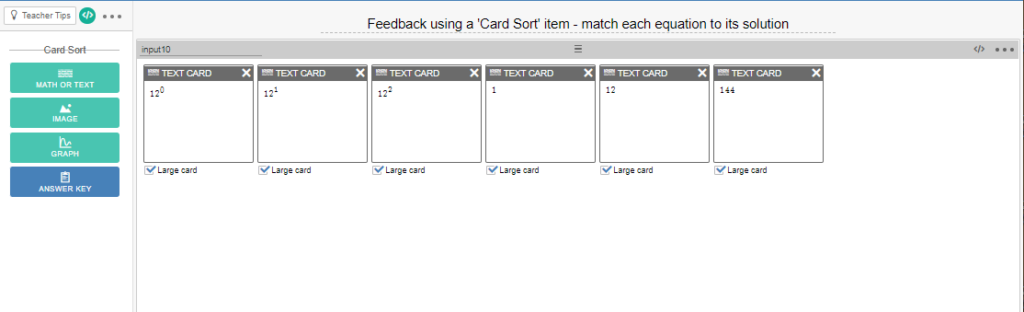
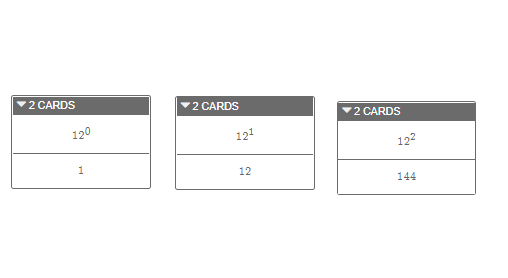
An important aspect to make this work is that you must go into the “Answer Key” and define the correct answers in order to give feedback. An example of this is here:
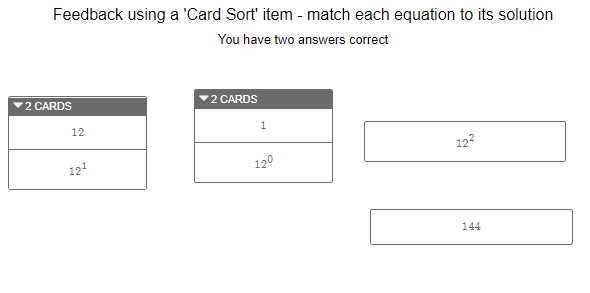
After defining the answer key, you will go into the CL (this is located in the left hand corner of the screen beneath the dashboard and to the right of “Teacher Tips”). In the CL, you’ll use the “subtitle:” sink to provide feedback. In this example, I defined variables to give feedback as students get pairs correct:
subtitle: "You have ${a} answers correct"
a=
when input10.totalCorrectCards=2 "one"
when input10.totalCorrectCards=4 "two"
when input10.totalCorrectCards=6 "all"
otherwise "no"
Because these cards are correct in pairs, I use “.totalCorrectCards” to define that a student receives feedback for every set of pairs that they find. A student would see a screen like this:
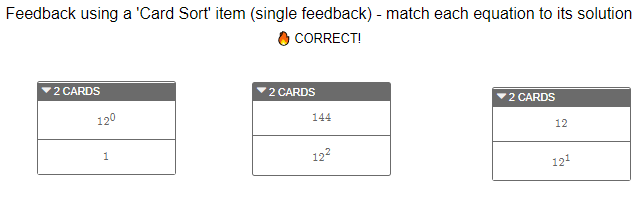
If you wanted to only provide feedback when all of the solutions are correct, you could use “.matchesKey” to only give feedback when all are correct. An example of this code would be:
subtitle: when input11.matchesKey "? CORRECT!" otherwise ""
In this situation, the student would only see feedback if they match all of the cards correctly. Students would see a screen like this:
And that’s all that I have for now. If there’s a situation I didn’t demonstrate leave me a message in the comments and I will try to add it.